Lots of us are still learning the MVC framework. Some are facing difficulties on how to interact the controller and the views. Probably one of the common problems we encounter was dealing with the dropdownlist. In a scenario that you will be having two dropdownlist linking to each other
(dropdown A and dropdown B). And on the onchange event of the dropdown A another set of values will be loaded on the dropdown B.
You don’t want to post the form containing the two dropdown lists back to the server each and every time a user selects a new value from dropdown A. That would create a really bad user experience. Instead, you want to update the list of dropdown B after a new value of dropdown A is selected without a form post.
so probably you be needed cascading drop-downs.
A good sample.
-87
Read More...

To use onchange event of dropdownlist on asp.net MVC
Hover effect over a div tag, Jquery
A hover effect will be applied usually on an image. Others have an image inside a div, its still an image which will be resize every mouse in and mouse out. What i have in here in this post will be a div with different element inside of it. It will expand the div and each element inside of it every mouse in and out.
First thing we need to have a html form which will serves our main page for this example.
What i have here is a div inside a div. The div id=card is the main container. Take a look of the styles i have in every div that holds my card information. It is so important to have that positioning of every element, you will know it on the later part of this post.

Next, we need to have the the latest jQuery library. And this AnimateMyDiv.js that i have below:
/*
  -------------------------------------------------
     FileName:AnimateMyDiv.js
     Author: http://chenz101tutorials.blogspot.com/
  -------------------------------------------------
*/


$(document).ready(function() {

  DivSmall($(this).find('div.innercontainer').children());

  $('ul.thumb li').hover(function() {
  $(this).css({ 'z-index': '10' }); /*Add a higher z-index value so this image stays on top*/
  DivBig($(this).find('div.innercontainer').children()); // this function call when mouse in
  $(this).find('div.container').addClass('hover').stop()
   .animate({
     width: '500px', /* Set new width */
     height: '300px', /* Set new height */
     padding: '10px'
   }, 100); /* this value of "200" is the speed of how fast/slow this hover animates */

  }, function() {
  $(this).css({ 'z-index': '0' }); /* Set z-index back to 0 */
  $(this).find('div.container').removeClass('hover').stop()
   .animate({
    width: '250px', /* Set width back to default */
    height: '150px', /* Set height back to default */
    padding: '5px'
   }, 200);
  DivSmall($(this).find('div.innercontainer').children()); // this function called when mouse out

  });

 function DivBig(content) {
  for (var i = 0; i < content.length; i++) {
   var fontSize = parseFloat($(content[i]).css("font-size"));
   var posTop = parseFloat($(content[i]).css("top"));
   var posLeft = parseFloat($(content[i]).css("left"));
   $(content[i]).css({ 'font-size': fontSize * 2 + 'px', 'top': posTop * 2 + 'px', 'left': posLeft * 2 + 'px' });
  }
  var contW = parseFloat($('div.innercontainer').width());
  var contH = parseFloat($('div.innercontainer').height());
 }

 function DivSmall(content) {
  for (var i = 0; i < content.length; i++) {
   var fontSize = parseFloat($(content[i]).css("font-size"));
   var posTop = parseFloat($(content[i]).css("top"));
   var posLeft = parseFloat($(content[i]).css("left"));
   $(content[i]).css({ 'font-size': fontSize / 2 + 'px', 'top': posTop / 2 + 'px', 'left': posLeft / 2 + 'px' });
  }
  var contW = parseFloat($('div.innercontainer').width());
  var contH = parseFloat($('div.innercontainer').height());
  $('div.innercontainer').css({ 'width': contW / 2 + 'px', 'height': contH / 2 + 'px' });
 }
});
Copy the codes above and paste it in a js templates name the file AnimateMyDiv.js.
Import both JS in the <head> of the Info.aspx.
Take a look on the function DivBig() and function DivSmall(), see how important the positioning of each element. It may be tricky but thats the real score, it makes every element go small and big.
To make it complete heres the CSS:

Read More...
Customize reCaptcha, remove theme. ASP.net
It was my first time to use reCaptcha, and i found out that there is a default theme plugin to it, where all i need to get is just the image, with the link reload captcha and link to play audio, similar to the facebook and twitter. Set the reCaptcha theme to "clean" ( theme: 'clean' ) still looks bad. And it took me a while to configure the API inorder to blend in and work good to the website we have.
Well, custom theming API allows you to do the same thing that Facebook has done. Unfortunately, this customization can't be done without javascript.
In order to use custom theming, you must first set the theme property of the RecaptchaOptions to 'custom'. This tells reCAPTCHA that it should not create a user interface of its own. reCAPTCHA will rely on the presence of HTML elements with the following IDs to display the CAPTCHA to the user:
* An empty div with ID recaptcha_image. This is where the actual image will be placed. The div will be 300x57 pixels.
* A text input with ID and name both set to recaptcha_response_field. This is where the user can enter their answer.
* Optionally, a div which contains the entire reCAPTCHA widget. This ID div should be placed into the custom_theme_widget and the style of the div should be set to display:none. After the reCAPTCHA theming code has fully loaded, it will make the div visible. This element avoids making the page flicker while it loads.
Note: dont forget to export the recaptcha.js before the above code.
On the page you will have this html code:
Incorrect please try again
<%--an empty div with ID recaptcha_image --%> | Get another CAPTCHA Get an audio CAPTCHA |
<%--a text input with ID and name both set to recaptcha_response_field --%>
So its kinda look like this( is use asp.net MVC ):

Have this script also to check if the inputed text is same as the image recaptcha that generated.
$(function() {
         $('#submitLink').click(function() {
             $.ajax({
                 type: "POST",
                 url: "/Home/isCaptchaValid",
                 async: false,
                 data: { "challenge": Recaptcha.get_challenge(), "response": Recaptcha.get_response() },
                 success: function(data) {
                     alert(data);
                 },
                 error: function() { alert('error'); }
             });
         });
     });
Take a look at the URL i call it will go on the HOME controller (as i used the MVC). The code behind for this application:
//be reminded that i use ASP.net MVC
//it will return a JSON boolean.

[AcceptVerbs(HttpVerbs.Post)]
      public bool isCaptchaValid(string challenge,string response)
      {

             // Add your operation implementation here
          Recaptcha.RecaptchaValidator validator = new Recaptcha.RecaptchaValidator
          {
              PrivateKey = "6LcouQcAAAAAAOjcmhymXE9M7jTHAmV9VsIm1UFy",
              RemoteIP=Request.UserHostAddress,
              Challenge=challenge,
              Response=response

          };
          Recaptcha.RecaptchaResponse Cresponse = validator.Validate();
          return Cresponse.IsValid;
      }
The parameters Recaptcha.get_challenge() and Recaptcha.get_response() are the helper functions that return the reCAPTCHA challenge string and the response that the user has typed in to the response field. They return null if the widget isn't showing. Can be used with the AJAX API to retrieve the answers so that an XMLHttpRequest can be used to post the reCAPTCHA solution.
View the demo.
For more info visit: ASP.NET CAPTCHA Library for reCAPTCHA
ciao
Read More...
101 Free Twitter Buttons, Badges and Widget to Show Off Your Tweets

One of the best ways to find new followers for your Twitter account is to provide any other online profile that you might already have. If you have a website, blog or other social media account linking to your Twitter account is a great way to do this.
There are a number of ways to promote your Twitter (Twitter) account. You can add yourself to one of the many growing Twitter directories, Twitter directories, or, have an eye catching button, widget or counter can be even more effective. Well, of course there are some Official Twitter Badges available...but what if you want something a little different(considering the color, format and sizes)?
So below are the list of links where you can download a buttons, embed badges and widgets that you can customize to include your tweets for your website:
Cute Twitter Bird Vector Art - by Smashing Magazine. The set is available as a free download and can be used for any purpose without any restrictions whatsoever. You can freely use it for both your private and commercial projects, including software, online services, templates and themes. The set may not be resold, sub-licensed, rented, transferred or otherwise made available for use. Please link to this article if you would like to spread the word.


TwitStamp – TwitStamp lets you set up an easy, attractive, and customizable badge that displays your latest tweet. You can select the badge’s size, background and so on. You can also set up a TwitCard that will show your name, avatar, bio, latest tweet, number of followers and more.

U Stand Out Twitter Badges – U Stand Out offers up a nice selection of badges you can use for your site or blog that range from artsy to straight-to-the-point.


SayTweet – SayTweet allows you to upload a picture of your own, tag the Twitter users shown, and their tweets will show up in speech bubbles on the image as they publish them.
Siah Design - Free Twitter Buttons - 42 Twitter buttons - some of them animated. You can download the graphics by right clicking the image and downloading the link. Just place the image on your site and link to your Twitter profile.


TwitterSalt – allows you to customize your widget on their site and then just by using a single line of HTML code you can post your updates on sites, on message boards, in emails and more.
Twignature - Another Japanese creation that allows you to enter your account name and have a personalized twitter button with your account name on it. Lots of sizes and a few different styles to choose from.

Twitt-Twoo - WordPress plugin Widget for your blog’s sidebar. There’s another WP sidebar widget plugin here.

MilkAddict - Twitter button - 2 simple round buttons.

Follow me on Twitter badges - 36 colorful Twitter badges. There are also some backgrounds to go with these badges.


31 Logos et boutons pour Twitter - 31 great buttons. The blog might not be in English but the buttons are. Some great designs here.


Web Design by mt - 10 Twitter Buttons for Free (German).

Randa Clay - Free Twitter Graphics - 18 different Twitter buttons like this one.


TwiBadge – is a WordPress plugin widget that allows you to easily add the official Twitter widget to your site. This allows you to show a group of your most recent tweets, your user name and number of followers, but best of all, it will also enable your readers to login and follow you so they can do everything right from your sidebar.

-87
Read More...
A fancy style for search suggestion
Apple is known to create beautiful products (next to the needed functionality of course).
The website from Apple isn't less: The layout is simple yet beautiful. Yet, one of the most awesome things about the website is the search functionality. It gives you suggestions (with images) about the several products they offer, making it really user-friendly.
Today, we're trying to recreate the effect from that website by creating a fancy apple.com-style search suggestion. Make sure you check out the demo (or visit Apple.com) to see this awesome effect work.
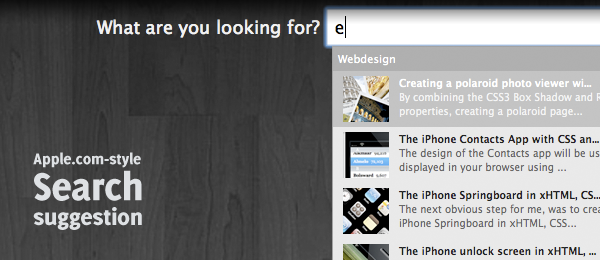
This example makes use of several techniques: MySQL (for the database), HTML/CSS for styling, PHP for retrieving the data and jQuery for the AJAX request. How about that for some nice way of combining powerful techniques to create something nice like this. You do need some basic knowledge about these techniques to fully understand this tutorial.
So here`s the nice and originally design search suggestion from Marcofolio.net
Type rest of the post here
Read More...
Redirecting Page using Jquery Timer
First and foremost, you might wondering whats the use of having these when we can use the predefine Response.Redirect([url]) method. Well, the main purpose of having this in Jquery is to allows you to set timer that fire an event after a certain amount of time. Asp.net equivalent has 'Application_BeginRequest' event where you can record the url path of the page and a Meta refesh TAG where you can set a time. But i feel more comfortable using this jquery timer, since i can also use this when im working on MVC. I will be creating a very simple example of how i do Jquery timer in redirecting page.
To begin with we need to have the the latest jQuery [compressed, 19kB] and Jquery timer inorder to work on timer.
We will be having two pages a Home.aspx and Info.aspx. The most common way in redirecting page with timer happens when you need to notify user and redirect her/him to a particular page. Or when an error occur while doing something you need to redirect the user.
Import both JS in the <head> of the Info.aspx.
Info.aspx page will hold the notification for the user. After 3 seconds it will be redirected to Home.aspx.
Here's the scripts how to use timer in redirecting a page.
On the form of Info.aspx, we just have the notification.
87
Read More...