I just had a project using Joomla 1.5 , it was my first time to used it and i find it very difficult to use the new module i added. It took me almost half a day to do research how to include the ninja shadow box module i installed for me to use it in my images. So i decided to post this blog for all joomla starter like me. This tutorial will explain how to install and include the module, we'll gonna use joomla 1.5.
So to start with will have a sample module, lets use Ninja Shadow Box more likely a jquery lightbox. Shadowbox is a cross-browser, cross-platform, cleanly-coded and fully-documented media viewer application written entirely in JavaScript. Using Shadowbox, website authors can display a wide assortment of media in all major browsers without navigating away from the linking page.
Lets say we already had the zip file of the module so the next to do is to install it in our joomla application.
1. Install the Module
Extension -> Install/Uninstall
2. Add a position in templateDetails.xml ( \templates\[template used]\templateDetails.xml ). We'll add a position ninja.
3. Edit the module Details and Parameters that we had installed.
Extension -> Module Manage -> Ninja Shadowbox
3.1 Enable module
3.2 Asign the position we added, ninja.
3.3 If there are things need to change on the parameters.
4. Include the newly added module in your index.php file ( \templates\[template used]\index.php ).
5. Now you can used it in your content images, see it here .
Hope it help. Enjoy =)
-
Read More...


Installing and Include new module for Joomla


Problem in Jquery Virtual Tour when place inside a pop-up div.
jQuery virtual tour - an extension to the simple panorama viewer that allows you to play a little bit more with jQuery by adding interactivity to transform some panoramic views into a virtual tour! FREE - released under the GPL licence.
No need for Flash, Quicktime ou Java. Your visitors will not have to install any software to experiment your virtual tour.
Advanced Panorama
This virtual tour plugin has the particularity to be accessible and can run even if javascript has not been activated - navigation uses the standard html tags <map> and <area> in accordance with w3c.
jQuery virtual tour DEMO / jQuery virtual tour Article
Simple Pandora Viewer
This small plugin for jQuery offers display as an interactive panorama, all images of your page containing the class 'panorama'
simple pandora viewer DEMO / simple pandora viewer Article
Well, both article sample had there image on a page none of them show how to do it in a pop-up/lightbox image where you can do like this:
So how to do it? Take these simple steps.
1.) Choose what viewer to used. In this case we will just used Simple Pandora Viewer.
2.) Follow the Installation on how to used pandora viewer on this article
3.) Create a pop-up div where you can place your image. See this sample.
Place your image inside <div class="divTextHolder">. Just adjust the css of class divTextHolder to fit the image.
As you try to test your application it works well in Firefox and other browsers but in IE the image won't appear and u will be having trouble in your jquery.js or jquery-1.3.2.js
The following error will occur:
Ln 32 Col 4414 Invalid Argument
fx.elem.style[fx.prop]=fx.now+fx.unit
Ln 24 Col 1337 Invalid Argument
elem[name]=value
To resolve those ERROR you need to do the ff:
on the css of #light need to comment/remove display:none and write this scripts
In this scenario you have to display the div that holds image after the page is ready, coz when you have to display none on div the scripts can't fine the current position of image, but well you know this error will only appeared in IE. IE sucks.
-
Read More...

CrossSlide image a Jquery plugin
CrossSlide is a neat plugin for JQuery that allows you to fade in from one image to the next, and even using some cool visual effects like panning. So I thought I would see how hard it is to set up and what sort of limitations is has (if any).
CrossSlide can do a few different things, depending on how it's called:
Slide + cross-fade
This is the kind of animation from which the plugin takes its name. Here is the jQuery code to set it up:
$(function() {
 $('#test1').crossSlide({
   speed: 45,
   fade: 1
   }, [
    { src: 'lib/sand-castle.jpeg', dir: 'up'   },
    { src: 'lib/sunflower.jpeg',   dir: 'down' },
    { src: 'lib/flip-flops.jpeg',  dir: 'up'   },
    { src: 'lib/rubber-ring.jpeg', dir: 'down' }
  ]);
});
Static cross-fade
Pretty simple effect, whose invocation is just as simple:
Notice how the sleep parameter has taken the place of speed, as there can be no speed in an image that's not moving. fade is still expressed in seconds and is additional to the sleep time. You cannot use both speed and sleep at the same time, because they mean different effects.
$(function() {
 $('#test2').crossSlide({
  sleep: 2,
  fade: 1
 }, [
    { src: 'lib/sand-castle.jpeg' },
    { src: 'lib/sunflower.jpeg'   },
    { src: 'lib/flip-flops.jpeg'  },
    { src: 'lib/rubber-ring.jpeg' }
  ]);
});
Ken Burns effect
Finally, CrossSlide can be brought up to the full visual power of a Ken Burns effect: panning, zooming and fading to specific points, to guide the eye of the viewer and convey meaning:
$(function() {
  $('#test3').crossSlide({
    fade: 1
     }, [
   {
     src:  'lib/sand-castle.jpeg',
     href: 'http://flickr.com/photos/spacetrucker/94209642/',
     from: '100% 80% 1x',
     to:   '100% 0% 1.7x',
     time: 3
   }, {
     src:  'lib/sunflower.jpeg',
     href: 'http://flickr.com/photos/hichako/1125341449/',
     from: 'top left',
     to:   'bottom right 1.5x',
     time: 2
   }, {
     src:  'lib/flip-flops.jpeg',
     href: 'http://flickr.com/photos/jayniebell/1125216143/',
     from: '100% 80% 1.5x',
     to:   '80% 0% 1.1x',
     time: 2
  }, {
     src:  'lib/rubber-ring.jpeg',
     href: 'http://flickr.com/photos/ruminatrix/1125292682/',
     from: '100% 50%',
     to:   '30% 50% 1.5x',
     time: 2
   }
]);
});
jquery.cross-slide.js(size: 11K; license: GPL; last updated on 14 May 2009)
See the jQuery documentation for more info.
Also visit gruppo4 for a nice sample demo.
Read More...
Email to Friend script and design for Asp.net
It's obviously important to give your readers a way to tell their friends and colleagues about your site - it's free advertising after all. That's why it is important to put the Email to Friends or Tell your Friends link at the top of every page of the site.
What we have here is just a link Email to Friend which open a pop-up div where user can enter their email address, the email addresses of his friends and a note(optional).
First thing we will do is to create the div.
<body>
<%--the link that will appear in the page--%>
<%--the div that will pop-up--%>
</body>
Second is to put a css for the div that pop-up.
 #popUpDivEmail
 {
  border: 8px solid #5E5E5E;
  font-size:12px;
  left:50%;
  margin:-185px auto 0 -155px;
  padding:10px;
  position:absolute;
  top:50%;
  width:300px;
  z-index:10000001;
  display:none;
 }
 .emailPopUp
 {
  color:#333333;
  font-family:arial,helvetica,tahoma,verdana,sans-serif;
  font-size:11px;
 }
 #EmailContainer
 {
  background:#FFFFFF none repeat scroll 0 0;
  border:1px solid #CCCCCC;
  height:370px;
  position:static;
  text-align:left;
  width:298px;
 }
 #EmailTitleContainer
 {
  background:#F2F2F2 none repeat scroll 0 0;
  height:13px;
  padding:5px 10px;
  position:relative;
 }
 #EmailTitleContainer a
 {
  color:#4C4C4C;
  position:absolute;
  right:10px;
  text-decoration:none;
  top:5px;
 }
 #the_form input, #the_form textarea
 {
  background:#FFFFFF none repeat scroll 0 0;
  border:1px solid #BBBBBB;
  color:#333333;
  font-family:arial,helvetica,tahoma,verdana,sans-serif;
  font-size:11px;
  font-weight:normal;
  line-height:1.4em;
  margin:0 0 8px;
  padding:3px;
  width:272px;
 }
 .btn
 {
  background:#FFFFFF none repeat scroll 0 0;
  border:1px solid #B5B5B5;
  color:#333333;
  cursor:pointer;
  font-size:11px ;
  font-weight:bold;
  margin:0 2px;
  padding:2px 4px;
  width:60px;
 }

  #addthis-pop-email-btns .btn:hover
 {
  color:#41BBFF;
  border: 1px solid #ececec;
 }

 #errorEmail
 {
  background:#F26D7D none repeat scroll 0 0;
  border-bottom:1px solid #DF5666;
  color:#FFFFFF;
  padding:5px 10px;
  display:none;
 }
So have this script in the header
To get the latest js that we exported on the header just copy and paste this latest.js and create a new js file and save it as jquery.js.
The function openThis() and closeThis() are for opening and closing the pop-up div respectively.
In the sendThis() function notice the variable emailRegex, its a regular expression for email. We check first the email enter before we call the server side function EmailToFriend. Another thing is the variable emails = Toemail.split(/[;?,?]/) in function GetAllEmail() this variable will split all the Email To either the user input semicolon ; or comma , to separate the multiple emails. The last function will limit the user number of character inputed on the notes to 255 only.
Basically the form will look like this:
And last part is the sever side function EmailToFriend where sending of email will take place. This is just a simple asp.net C# code, you can have your own code in here depending on your scope and limitation on how you will have it.
public JsonResult EmailToFriend(string[] To_Email, string From_Email, string msg)
 {
     for (int i = 0; i < To_Email.Count(); i++)
     {
         MailMessage message = new MailMessage();

         //subject
         message.Subject = From_Email + " has shared something with you at Chenz101Tutorials";
         string url = HttpContext.Request.UrlReferrer.ToString();

         string body = msg + " " + url;
         body += "P.S. This message was sent by" + From_Email + "via chenz101tutorials.blogspot.com";

         //body
         message.Body = body;
         message.IsBodyHtml = true;
         //from
         message.From = new MailAddress(From_Email);
         try
         {
             message.To.Add(To_Email[i]);
             //Set SMTP Client
             SmtpClient SmtpHost = new SmtpClient();
             SmtpHost.EnableSsl = true;
             SmtpHost.Host = "smtp.gmail.com";
             SmtpHost.Port = 587;
             NetworkCredential netCred = new NetworkCredential("username", "password");

             SmtpHost.Credentials = netCred;

             //Send Email
             SmtpHost.Send(message);
         }
         catch (Exception ex)
         {
             return Json(false);
         }
     }

     return Json(true);
 }
Read More...
Customize lightbox for div element
Lots of thread i read about Lightbox says it wont work on the div element only on images. So i tried to customize some of the lighbox jqueries and its css, and ending up creating a new lightbox.js that adopts div element. This is the main content. To display a lightbox click here
To have a customize lighbox for div element simply:
1. Create the css file for the lightbox [ lightbox.css ].
2. Create the js file[ gsp_lightbox.js ].
3. Import the two file in your page header.
4. Have your html body. And on your hyperlink event ONCLICK add "showLightBox(); return false;" which will open the div lightbox. The div id="light" will contains all the information inside the popup div. Refer html body.
Below contains all the code you will be needed. { copy and paste }
lightbox.css
#fade
{
display: none;
background-color:#3E3E3E;
position: absolute;
top: 0%;
left: 0%;
z-index: 90;
width: 100%;
height: 500px;
-moz-opacity: 0.8;
opacity: 0.8;
filter  : alpha(opacity=80);
}

#light
{
display: none;
position: absolute;
top: 0%;
left: 0%;
z-index: 100;
text-align: left;
width:100%;
}

.white_innerContent
{
background-color: #fff;
position: relative;
width: 560px;
height: 500px;
margin: 0 auto;
color:#333333;
}

.lightfoot
{
font-family:Arial,Helvetica,sans-serif;
background-color:#AD7032;
height:32px;
color:#fff;
font-weight:bold;
font-size:12px;
}

.divTextHolder
{
border: 15px solid #B2AD94;
overflow:auto;
width: 510px;
height: 440px;
padding:10px;
}
gsp_lightbox.js
/**
* customized lightbox for div element
* GSP
* http://chenz101tutorials.blogspot.com/
*/

function showLightbox() {

// Get page sizes
var arrPageSizes = currentPageSize();
// Get page scroll
var arrPageScroll = currentPageScroll();

// Style overlay and show it
$('#fade').css({
width: arrPageSizes[0] + 'px',
height: (arrPageSizes[1] + 100) + 'px'
}).fadeIn();
  // calculate top and left offset for the jquery-lightbox div object and show it
$('#light').css({
top: (arrPageScroll[1] + (arrPageSizes[3] / 10)) + 'px',
left: arrPageScroll[0] + 'px'
}).show();


$(window).resize(function() {
// Get page sizes
var arrPageSizes = currentPageSize();
// Get page scroll
var arrPageScroll = currentPageScroll();

// Style overlay and show it
$('#fade').css({
width: arrPageSizes[0] + 'px',
height: (arrPageSizes[1] + 100) + 'px'
});
// Calculate top and left offset for the jquery-lightbox div object and show it
$('#light').css({
top: (arrPageScroll[1] + (arrPageSizes[3] / 10)) + 'px',
left: arrPageScroll[0] + 'px'
});

});

//Enable a support to keyboard navigation
$(document).keydown(function(objEvent) {
_keyboard_action(objEvent);
});
}


//get PageSize
function currentPageSize() {
var xScroll, yScroll;
if (window.innerHeight && window.scrollMaxY) {
xScroll = window.innerWidth + window.scrollMaxX;
yScroll = window.innerHeight + window.scrollMaxY;
} else if (document.body.scrollHeight > document.body.offsetHeight) { // all but Explorer Mac
xScroll = document.body.scrollWidth;
yScroll = document.body.scrollHeight;
} else { // Explorer Mac...would also work in Explorer 6 Strict, Mozilla and Safari
xScroll = document.body.offsetWidth;
yScroll = document.body.offsetHeight;
}
var windowWidth, windowHeight;
if (self.innerHeight) { // all except Explorer
if (document.documentElement.clientWidth) {
windowWidth = document.documentElement.clientWidth;
} else {
windowWidth = self.innerWidth;
}
windowHeight = self.innerHeight;
} else if (document.documentElement && document.documentElement.clientHeight) { // Explorer 6 Strict Mode
windowWidth = document.documentElement.clientWidth;
windowHeight = document.documentElement.clientHeight;
} else if (document.body) { // other Explorers
windowWidth = document.body.clientWidth;
windowHeight = document.body.clientHeight;
}
// for small pages with total height less then height of the viewport
if (yScroll < windowHeight) {
pageHeight = windowHeight;
} else {
pageHeight = yScroll;
}
// for small pages with total width less then width of the viewport
if (xScroll < windowWidth) {
pageWidth = xScroll;
} else {
pageWidth = windowWidth;
}
arrayPageSize = new Array(pageWidth, pageHeight, windowWidth, windowHeight);
return arrayPageSize;
};

function currentPageScroll() {
var xScroll, yScroll;
if (self.pageYOffset) {
yScroll = self.pageYOffset;
xScroll = self.pageXOffset;
} else if (document.documentElement && document.documentElement.scrollTop) {  // Explorer 6 Strict
yScroll = document.documentElement.scrollTop;
xScroll = document.documentElement.scrollLeft;
} else if (document.body) {// all other Explorers
yScroll = document.body.scrollTop;
xScroll = document.body.scrollLeft;
}
arrayPageScroll = new Array(xScroll, yScroll);
return arrayPageScroll;
};

//close LightBox
function closeLightbox() {
$('#light').css('display','none');
$('#fade').fadeOut(function() { $('#fade').css('display', 'none'); });

 // Show some elements to avoid conflict with overlay in IE. These elements appear above the overlay.
$('embed, object, select').css({ 'visibility': 'visible' });
}


/**
* Perform the keyboard actions
*
*/
function _keyboard_action(objEvent) {
// To ie
if (objEvent == null) {
keycode = event.keyCode;
escapeKey = 27;
// To Mozilla
} else {
keycode = objEvent.keyCode;
escapeKey = objEvent.DOM_VK_ESCAPE;
}
 // Get the key in lower case form
key = String.fromCharCode(keycode).toLowerCase();
 // Verify the keys to close the ligthBox
if ((key == 'c') || (key == 'x') || (keycode == escapeKey)) {
closeLightbox();
}
}
html body
<body>
<%-- overlay --%>
<%-- the pop-up div starts here. --%>
This is the lightbox content.
This is the lightbox content.
This is the lightbox content.
This is the lightbox content.
This is the lightbox content.
This is the lightbox content.
This is the lightbox content.
This is the lightbox content.
This is the lightbox content.
This is the lightbox content.
This is the lightbox content.
This is the lightbox content.
This is the lightbox content.
<%-- the pop-up div ends here. --%>
</body>
well, it looks like this after.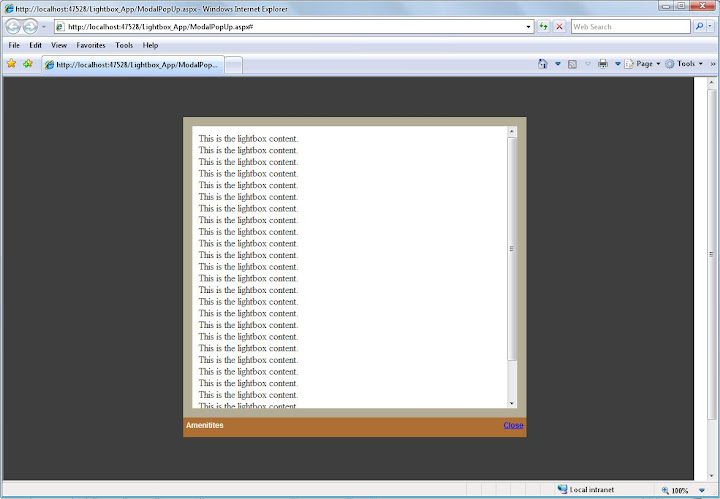 Read More...